Showing posts with label partition. Show all posts
Showing posts with label partition. Show all posts
Saturday, October 4, 2014
Manage hard disk Partitions with Partition Assistant
Windows operating systems include the partition management facilities are indeed hard disk, for example on Windows XP via right click MyComputer and select Manage and then open the Disk Management.
However, the ability of these facilities is very limited, only able to remove and form a partition. Other capabilities such as resizing partitions (to form a new partition), copy partitions, sliding partitions, and other non-existent.
One alternative, we can use a free application called Partition Assistant. The following is an example of how to use:
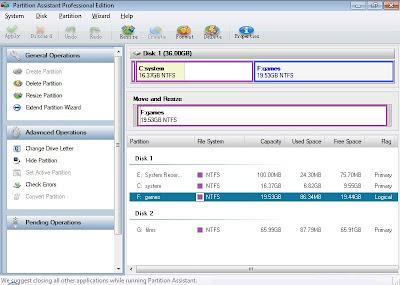
- launch Partition Assistant. We can see some of the capabilities of these applications with a right click on a partition. Ability: change the size of the partition, copy partition, delete partition, format partition (with file system FAT32 or NTFS), giving the label name (identifier) of the partition, remove the hard drive (all partitions), change the drive letter of the partition, hide partition (if it contains confidential data), set the active (for operating system partitions), as well as checking the existence of bad sectors.
- the example in this article is how to resize a partition to form a new partition. Click the target partition (the Disks). Underneath (on the Move and Resize), click-hold on the circle icon at the end of the partition and sliding.
- automatically, on the Disks will be performing new Unallocated partition labeled size equal to results altered the size of free space partition of the target.
- right click on the Unallocated partition labeled new and select Create.
- in the Create Partition dialog box, type the name of the identifier (label) a new partition in the Partition labels. Select the file system to format the new partition in the File System. When it is finished, click the OK button.
- click Apply button at the top of the screen (the ribbon menu) to apply editing partitions.
- we can also check for the existence of bad sectors in the partition menu of the Disk target passing Surface Test or passing > right click target and select Check partition Partition.
- Click the Start button on the Disk Surface Test dialog box to begin the process of checking for bad sectors. Wait until the process is complete.
You can download partition assistant here

Friday, August 29, 2014
How to Partition SD Card Android
How to Partition SD Card Android - The Android smartphone presence of an SD Card can be quite vital. Android smartphones internal memory limitations require us to add external memory to store a variety of data ranging from the essential to the data than just entertainment. It seems like the hard drive on a PC, memory grouping for specific files necessary to facilitate pretty organizing important data on Android memory. Unfortunately the Android smartphone to date can only support one external memory slot. As a solution, it can be done to partition SD Card Android.
To Partition SD Card Android needed a software development partitions in this paper we choose "Mini Tool Partition Wizard". This is a windows software which can be downloaded for free at> http://www.partitionwizard.com/download.html.
Then install the software on a computer buddy.
How to Partition SD Card Android via PC
1. Remove the SD card of the Android smartphone, then connect to the PC using a Card Reader or if using a laptop live input it into the SD Card slot laptop.
2. Wait until the SD Card read. Furthermore, backup all the data on the SD Card (copy it to a folder on the external SD Card). The process will partition mengabitkan ter-format SD Card and causes all data will be lost.
3. Run the software Mini Tool Partition Wizard. Then right click on the SD Card select "Delete" make sure the SD Card is in a state of "unallocated"
4. Select "Create Partition". Adjust as needed partition capacity allocation pal. Suppose my friend has a capacity of 8 GB SD Card and want to partition into two sections each 6 GB and 2 GB. 6 GB as Logical (for storing data) and the remaining 2 GB Primary (for File System).
In the "Create As" fill "Primary"
In the "File System" content "FAT32"
In the "Partition Size" content "2000 MB"
Click "OK"
 The first partition for File System completed
5. Following that create a second partition for data. Select "Create Partition".
In the "Create As" content "Logical"
In the "File System" content "EXT2"
On the "Cluster Size" content "4kb"
In the "Partition Size" content "6000 MB"
Click "Apply" at the top left
6. Wait for the process several times and my friend has been partitioned SD Card.
Now you can capitalize on the SD Card partition as needed. Similarly, our review of How to Partition SD Card Android.
Then install the software on a computer buddy.
How to Partition SD Card Android via PC
1. Remove the SD card of the Android smartphone, then connect to the PC using a Card Reader or if using a laptop live input it into the SD Card slot laptop.
2. Wait until the SD Card read. Furthermore, backup all the data on the SD Card (copy it to a folder on the external SD Card). The process will partition mengabitkan ter-format SD Card and causes all data will be lost.
3. Run the software Mini Tool Partition Wizard. Then right click on the SD Card select "Delete" make sure the SD Card is in a state of "unallocated"
4. Select "Create Partition". Adjust as needed partition capacity allocation pal. Suppose my friend has a capacity of 8 GB SD Card and want to partition into two sections each 6 GB and 2 GB. 6 GB as Logical (for storing data) and the remaining 2 GB Primary (for File System).
In the "Create As" fill "Primary"
In the "File System" content "FAT32"
In the "Partition Size" content "2000 MB"
Click "OK"
The first partition for File System completed5. Following that create a second partition for data. Select "Create Partition".
In the "Create As" content "Logical"
In the "File System" content "EXT2"
On the "Cluster Size" content "4kb"
In the "Partition Size" content "6000 MB"
Click "Apply" at the top left
6. Wait for the process several times and my friend has been partitioned SD Card.
Now you can capitalize on the SD Card partition as needed. Similarly, our review of How to Partition SD Card Android.
Subscribe to:
Posts (Atom)
